Terraforming a Docker environment

Last week we delved deeper into Terraform, one of the newest projects developed by Hashicorp. We researched what it was all about, what its main advantages are and how we could use it for setting up our own infrastructure. Our desire by using Terraform is to easily deploy our infrastucture and orchestrate our Docker environment.
1. Infrastructure as code
Infrastructure as Code (IaC), or basically programmable infrastructure, is a concept that has been in development for quite a few years now. The base idea is to manage and provision your infrastructure by code (configuration files, scripts, etc). This does not necessarily incline automation of infrastructure but has to be viewed as something separate.
Terraform is an example of IaC that converts your infrastructure to human friendly config files that are JSON compatible. Next to that it also supports version control. But the coolest and most interesting part is probably the fact that it manages to compose multiple tiers like IaaS, PaaS and SaaS. With Terraform there is a common configuration platform, a shared language to deploy the entire infrastructure of a modern datacenter. Whenever there are changes in this configuration, Terraform will implement the changes. All of this is done by a single command only: terraform apply.
2. Compose Multiple tiers
The way Terraform manages to compose multiple tiers is via providers. This is a term used by all tools developed by Hasicorp that can be seen as the integration point of the software. Their main objective is to expose resources like AWS instances, security groups, docker containers, etc. For example, the providers that we would be working with for our infrastructure are Amazon Web Services and Docker.
When we started out with using Terraform’s providers, we immediately ran into a problem. Unlike resources there is no proper way to configure dependency for providers. As you might have guessed, the Docker provider is highly dependent on the AWS provider. Without a running server there won’t be many containers deployed, obviously.
In the case of resources there is a solid way to set explicit dependencies by defining the parameter depends_on. For example, when assigning an elastic IP to an EC2 instance. We’ll request the id attribute from the aws_instance.example resource. For obvious reasons there has to be an aws_instance.example resource existing to get this “id” from. In other words, our elastic IP resource is dependent on the AWS instance resource. The way to explicitly define this dependency is by adding the parameter depends_on to the resource as in the example below:
resource "aws_eip" "ip" {
    instance = "${aws_instance.example.id}"
    depends_on = ["aws_instance.example"]
}
3. Terraforming Docker & Coreos
In the case of providers there is, as said before, no similar method to define dependency. That’s why we solved this by using a work-around. We divided our providers into two separate modules. In the world of Terraform modules are self-contained packages of configurations that are managed as a group. By isolating each provider into a separate module we’re able to first launch our AWS provider and our Docker provider afterwards.
Launching our infrastructure in the correct order is done by executing the following command: $ terraform apply -target=module.aws && terraform apply -target=module.docker
Firstly we’ll create a simple root.tf file in the root folder of our project.
module "aws" {
	source	= "./aws"
}

module "docker"{
	source = "./docker"
	aws_ip = "${module.aws.public_ip}"
}
For each module we created a separate directory. The Docker module also gets the aws_ip variable containing the IP address of our AWS instance that will be spinned up. It’ll be using this IP address to connect to the Docker endpoint/remote API.
AWS module
In the AWS directory we also create a terraform file main.tf. This one will be a lot more extensive than root.tf. We’ll specify everything that our AWS EC2 instance requires to be deployed. This means the AWS provider with access and secret key, the instance resource containing security groups, ssh key, user-data, provisioners, … EVERYTHING
The first part of our configuration looks like this:
provider "aws" {
    access_key = "your AWS access key"
    secret_key = "your AWS secret key"
    region = "your preferred region"
}

resource "aws_instance" "core" {
    ami = "ami-fa627590"
    instance_type = "your instance type"
    security_groups = [
        "${aws_security_group.allow-ssh.name}",
        "${aws_security_group.allow-docker.name}",
        "${aws_security_group.allow-all-http-https.name}",
    ]
    key_name="your private key"
    ...
}
A few things need to be noted here:
- our AWS instance is using a CoreOS 899.15.0 (Stable) image.
- we have 3 security groups for controlling traffic to and from our machine
- we provide our instance with cloud-config through user-data
- we use an initialization bash script that will be executed through SSH
AWS Security groups
AWS security groups are considered resources in Terraform. These resources will be used by the aws_instance resource where they’re defined in a list of strings (see example above). It’s fairly easy to create these security groups inside our terraform configuration file. Check out the example below:
resource "aws_security_group" "allow_all" {
  name = "allow_all"
  description = "Allow all inbound traffic"

  ingress {
      from_port = 0
      to_port = 0
      protocol = "-1"
      cidr_blocks = ["0.0.0.0/0"]
  }

  egress {
      from_port = 0
      to_port = 0
      protocol = "-1"
      cidr_blocks = ["0.0.0.0/0"]
  }
}
This will create a new security group on AWS EC2 called “allow_all”. Defining rules for a security group is done by adding either or both an ingress and egress statement. Ingress controls the inbound traffic while egress will control the outgoing traffic. Each block can be specified multiple times for each rule. More info about all possible arguments can be found on the official documentation of Terraform.
cloud-config
We provide cloud-config data to our AWS instance to customize Docker, specifically to enable the remote API with TLS authentication. The Docker provider implementation of Terraform will connect to the remote API for executing Docker commands on our remote server. The remote API is a powerful yet dangerous tool to mess around with. That’s why it’s really important to secure this connection. We absolutely don’t want anyone else to be able to start creating/deleting Docker containers on our machine.
To set this up there are 3 main steps which will be defined in our cloud-config file. Note that we created the required self-signed certificates and private keys locally. View this guide to learn how to do this yourself.
- Create TLS keys
- Enable the secure remote API on a new socket
- Create a drop-in configuration for the systemd Docker service
This results in this cloud-config.yaml file:
#cloud-config

# STEP 1: Creating TLS keys
write_files:
    - path: "/etc/docker/ca.pem"
      permissions: "0644"
      content: |
        -----BEGIN CERTIFICATE-----

        -----END CERTIFICATE-----

    - path: "/etc/docker/server.pem"
      permissions: "0644"
      content: |
        -----BEGIN CERTIFICATE-----

        -----END CERTIFICATE-----

    - path: "/etc/docker/server-key.pem"
      permissions: "0600"
      content: |
        -----BEGIN RSA PRIVATE KEY-----

        -----END RSA PRIVATE KEY-----

# STEP 2: enable the secure remote API on a new socket
coreos:
  units:
    - name: docker-tls-tcp.socket
      command: start
      enable: true
      content: |
        [Unit]
        Description=Docker Secured Socket for the API

        [Socket]
        ListenStream=1234
        BindIPv6Only=both
        Service=docker.service

        [Install]
        WantedBy=sockets.target

# STEP 3: Drop-in config
    - name: docker.service
      drop-ins:
        - name: 10-tls-verify.conf
          content: |
            [Service]
            Environment="DOCKER_OPTS=--tlsverify --tlscacert=/etc/docker/ca.pem --tlscert=/etc/docker/server.pem --tlskey=/etc/docker/server-key.pem"
The contents of this cloud-config file will be provided to the AWS instance as user-data. This is done by adding the line user_data="${file("/path/to/cloud-config.yaml")}" within the aws_instance.example resource defined in our terraform configuration file.
Terraform provisioners
Lastly we want to provision our AWS instance with all the necessary files and our custom Docker images. When a resource is initially created, provisioners can be used to intialize that resource. There are many types of provisioners available. We’ll use the file provisioner and remote-exec provisioner to provision our remote machine.
The file provisioner is used to copy files or entire directories from the machine executing terraform onto the newly created machine. Both SSH and WinRM connection types are supported here. We’ll be using the SSH connection to copy our initialization script onto the remote machine.
provisioner "file" {
        source = "/local/path/to/init.sh"
        destination = "/remote/path/to/init.sh"
        connection {
            type="ssh"
            user="core"
            private_key="${file("/local/path/to/terraform_pr_key")}"

        }
    }
The remote-exec provisioner will invoke the script that we copied to the newly created machine. Just like the file provisioner, both SSH and WinRM are supported connection types.
provisioner "remote-exec" {
        inline = ["bash /remote/path/to/init.sh"]
        connection {
            type="ssh"
            user="core"
            private_key="${file("/local/path/to/terraform_pr_key")}"

        }
    }
Docker module
In the directory we created for our Docker module, we made another terraform configuration file main.tf. In this file we’ll define anything that has to do with Docker. This means setting up the provider, creating/running Docker containers and pulling Docker images.
Configuration
The first thing that has to be done, is to configure the Docker provider.
# Configure the Docker provider
variable "aws_ip" {

}

provider "docker" {
    host = "tcp://${var.aws_ip}:1234/"

}
We initialize a variable called “aws_ip” that will be filled in by our AWS module. As you look back to our root.tf config file, you’ll notice that we put our AWS instance IP address into the variable “aws_ip”. This is the tricky part to make our separate and dependent modules work together. To explain how we did this, take a look at this bit of code from our terraform config file for AWS.
output "public_ip" {
    value="${aws_instance.core.public_ip}"
}
We define an output variable public_ip which will be outputted when terraform apply is called and can be queried by using the terraform output command. In this case we’re outputting the public IP address of the AWS instance. Whenever we’ll launch our infrastructure, this variable will contain the correct IP address of our remote machine and can be used by the Docker module and provider.
Containers
If everything is configured correctly, we can start with creating containers. It’s fairly easy and self-explanatory to set this up so let’s quickly see what we can do with it.
The Docker provider has 4 types of resources:
- docker_container
- docker_image
- docker_network
- docker_volume
Each of these does kind of exactly what you would expect. docker_container manages the lifecycle of a Docker container. This means creating a container with the specified options and being able to control whether or not the container should be kept running and if not, define the restart policy.
Here is a simple example of one of our containers:
# Start elastic container
resource "docker_container" "elastic" {
    image = "${docker_image.elastic.latest}"
    name = "elastic"
    hostname = "elastic"
    env = ["SERVICE=elastic", "PROJECT=stage", "ENVIRONMENT=operations"]
    restart= "no"
    must_run="true"
}
The value of the argument image refers to a docker_image resource. This resource is used to download and export the ID of a Docker image. By using this alongside the docker_container resource, we can get the latest image ID without having to hardcode it. To continue with our example:
# Pull images
resource "docker_image" "elastic" {
    name = "t0t0/docker-alpine-elasticsearch:latest"
}
This bit of code will download the latest version of the Docker image t0t0/docker-alpine-elasticsearch (which is our own minimalistic Docker image for elasticsearch btw!) and export the ID to be used in the docker_container resource. We are in the process of publishing all our minimal Docker images to our GitHub repo and will make a blogpost about this in the near future.
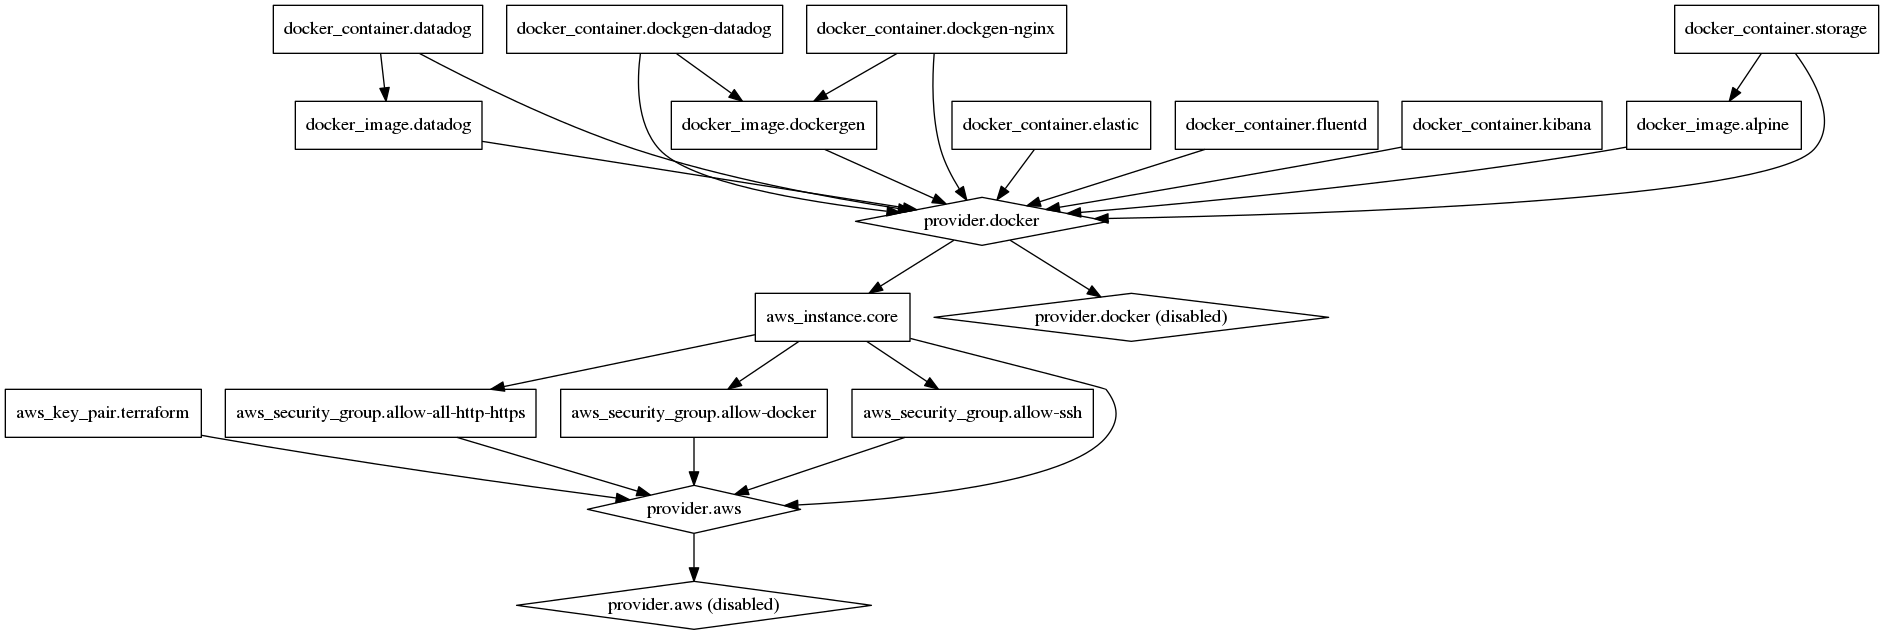
Terraform graph
Lastly we would like to mention another cool key feature of terraform which is $ terraform graph. Terraform is able to generate a dependency graph based on the Terraform configuration. It is basically a visual representation of either a configuration or execution plan. The graph of the configuration that we created for testing out terraform is this: