Getting started with docker: Deploying containers
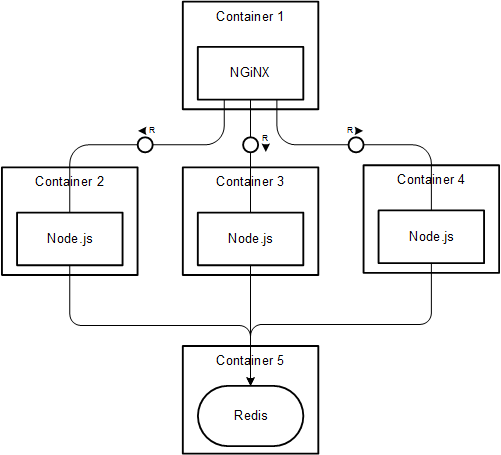
To start getting familiar with Docker, we started out with creating a local environment consisting of two NodeJS containers, a Redis container as a Database and an Nginx container to be used as a load-balancer.
We based ourselves on this sample workflow.
1. Deploying Docker containers locally
As we started out, we deployed our containers by manually issueing the docker-run command.
Because managing multiple containers is rather inefficient with this command, we decided to work with docker-compose, a tool for defining and running multi-container Docker applications.
Very much like working with Ansible & Vagrant, which we are both experienced by, docker-compose automatically deploys (in this case container instead of VM’s) based on specifications that are defined in a YML-file.
Our docker-compose.yml looked like this:
nginx:
    container_name: nginx
    build: ./nginx
    links:
        - node1:node1
        - node2:node2
    ports:
        - "8000:80"
node1:
    container_name: node1
    build: ./node
    links:
        - redis
    expose:
        - "3000"
node2:
    container_name: node2
    build: ./node
    links:
        - redis
    expose:
        - "3000"
redis:
    container_name: redis
    image: redis
    ports:
        - "6379"
As you can see, we used our own Dockerfiles for both the Nginx and NodeJS containers. Those were located in the folder ‘ngninx’ and ‘node’ respectively.
To orchestrate the relationships between containers we made use of the --link property. This enables a specific container to resolve the addresses of other containers by name or alias.
The only port that is published by the docker-machine to allow access from the outside is port 8000 which is mapped to port 80 on the Nginx container.
Running the command docker-compose up would automatically deploy our containers in order of their dependency.
2. Deploying containers on a remote server
The next step was to deploy the Docker containers remotely. This time we would run a NodeJS application, developed by our colleague, on both node containers.
This remote server was a CoreOS VM running on AWS.

We immediately ran into a major problem: CoreOS doesn’t have a Python interpreter installed which is necessary to execute Ansible commands, nor does it have a package manager to install Python.
Luckily, Ansible has a raw execution mode which allows shell-commands to be executed directly on the remote machine. Via this method in combination with an existing coreos-bootstrap Ansible role we were able to get Ansible running after all.
To read more about this solution, check out this blog post.
We created our own ansible role which would be executed for our CoreOS host via SSH.
Within this role we firstly create the two node containers, generate a custom Nginx config file based on our template and finally create the Nginx container where this config file is mounted on.
Our Ansible tasks looked like this:
- name: Install docker-py as a workaround for Ansible issue
  pip: name=docker-py version=1.2.3
- name: Setup node containers
  docker:
   count: "{{ node_count }}"
   image: dev-node
   state: "{{ node_state }}"
   expose:
   - 3000
- name: Generate nginx config file
  template:
    src: nginx.conf.j2
    dest: /home/core/config/nginx/nginx.conf
- name: Setup Nginx container
  docker:
   name : nginx
   image: dev-nginx
   state: "{{ nginx_state }}"
   ports:
   - "80:80"
   volumes:
   - /home/core/config/nginx/nginx.conf:/etc/nginx/nginx.conf
   links:
   - "node1:node1"
   - "node2:node2"
For both parameters ‘count’ and ‘state’ we declared variables. The images ‘dev-node’ and ‘dev-nginx’ were our own built images according to our Dockerfiles.