Continuous integration
Our next step in learning docker was setting up continuous integration. For this we used CircleCI and some other nifty features. This allowed the code of the other interns whom were developing applications to be automatically deployed after they pushed it to GitHub.
1. Makefiles
The first thing we used were makefiles. Here we could define our own make commands so we needn’t type out the full commands. An example of one of these makefiles can be found below.
#####
# vars
####

IMAGE_NAME=demo
IMAGE_VERSION=latest
PORTHOST=80
PORTGUEST=80
DOCKERFILEPATH=./Dockerfile

####
# concatenate vars
####

# full file name for tarbal
TARNAME = $(IMAGE_NAME).tar
# full image name
IMAGE = $(IMAGE_NAME):$(IMAGE_VERSION)

####
# Make commands
####

docker_build:
	docker build -t $(IMAGE) -f $(DOCKERFILEPATH) .

docker_run:
	docker run -d -p  $(PORTHOST):$(PORTGUEST) $(IMAGE); sleep 10

docker_build_run: docker_build docker_run

docker_save:
	docker save -o $(TARNAME) $(IMAGE)
These makefiles also enable us to nest make commands like docker_build_run. This gives us access to the one command to build and run aswell as both run and build separately.
2. CircleCI
In this section we are not going to discuss how to set up CircleCI. For that we like to point you to the documentation on their website.
1. CircleCI and docker
So we had to set up CircleCI for the 2 projects for wich we had to provide the infrastructure. We ran both these projects on the CoreOS server we talked about last week . We used an nginx container to proxy to both these projects but more about that later.

For setting up CircleCI we defined the tasks in our circle.yml file. Because we were using makefiles in our github directory we could use those make commands in the circle.yml file.
machine:
  services:
    - docker

dependencies:
  pre:
    - sudo apt-get update; sudo apt-get install s3cmd
  override:
    - sudo mkdir config
    - sudo cp infra/config/$CIRCLE_BRANCH/* config/
    - MK_CONFIG=config make docker_build

test:
  override:
    - MK_CONFIG=config  make docker_run_node
    - MK_CONFIG=config  make docker_curltest

deployment:
  dev:
    branch: master
    commands:
      - MK_CONFIG=config make docker_save
      - MK_CONFIG=config make s3_config
      - MK_CONFIG=config make s3_upload
      - MK_CONFIG=config make docker_deploy
As you can see the circle.yml file becomes a lot more managable and readable using the make commands.
In our makefiles we don’t define any variables. The files with variables are defined by providing the path to the directory in the environment variable MK_CONFIG. This allows us to use different settings depending on where we want to run the make commands.
The command sudo cp infra/config/$CIRCLE_BRANCH/* config/ is an implementation of this. In our project directory we use a folder for each branch we are working on, CircleCI then when executing this command fills in the $CIRCLE_BRANCH with the correct branch it is building for and uses the correct settings for the rest of the build and deployment.
2. continuous integration with CircleCI
Continuous integration with CircleCI is set up with the circle.yml file. Each time you push your code CircleCI automatically builds and deploys your application in the way you defined in the circle.yml file.
The workflow we went with is shown in the picture below.
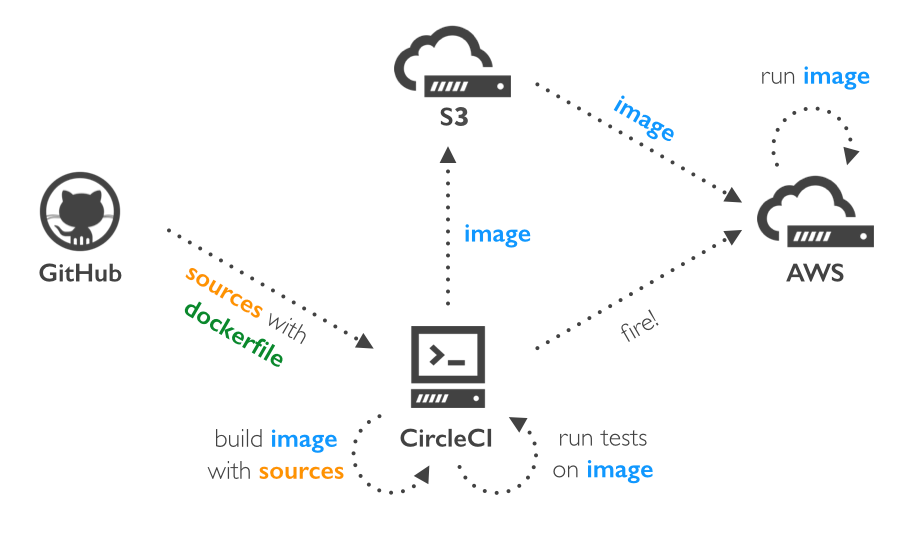
So when one of the developers pushes to his repo the CircleCI machine starts. First off we do a test build on the CircleCI docker machine. Because currently there are no unit tests included in the project, we only test if the container is still accessible (meaning we didn’t get a crash on the deployed code). This is as simple as curling to the container’s ip address.
When this very basic test succeeds we put our image into a tarbal and push that tarbal to S3 storage. This enables us to deploy this image anywhere we want with relative ease. After the upload to S3, we have to get this tarbal on our EC2 machine. Then we just download the tarbal and replace the current tarbal we have on our EC2 machine for that container.
Next we have to unpack and deploy this image. Because we can’t remove and replace an image that is currently in use we first have to remove the old containers using that image. When those old containers are removed, we can replace the image and deploy the new containers. In a production environment this would require orchestration but for our dev enviroment this is sufficient.